Showing posts with label recipe. Show all posts

Monday, February 18, 2008

Sentimental Lentil


So many of the soups I muck about with don't have precise measurements, and are based only on the stuff I know ought to be in there.

I'm making a lentil soup today--that's the raw stuff in the picture. I just thought it was colorful and interesting to look at, so I snapped a photo.

I first became interested in trying a lentil soup after the Boy and I had an amazing batch of soup at a little Middle Eastern place near where we lived up north. It was incredibly fragrant--you could smell the nutmeg and cumin before you even took a bite. Sadly, I think that batch of soup was a mistake of some kind--maybe the lid had come off the nutmeg, and they'd dumped in more than they'd intended. We went back several times, but the soup was never as good.

The weekend we had the lentil soup at The Bronte Bistro (a novel idea!) attached to Joseph Beth Booksellers, and that reminded me I'd been wanting to try making it.

Into my trusty slow cooker, I threw the following:

Lots and lots of chicken stock, and a scoop of MSG-free chicken soup base for more flavor
about a pound (?) of red lentils, cumin, finely chopped ginger, about half a grated nutmeg (which would be maybe a little less than a teaspoon of powdered?) spring onions, chopped onion, chopped red potatoes, celery, sea salt... and that's it, I think. I may decide it needs something else later. Soups are fantastically easy in that they lend themselves so nicely to improvisation.

Saturday, February 16, 2008

Oh, and PS...

Regarding the previous goi cuon post... if the flexible and sort of sticky texture of the uncooked fresh rolls doesn't suit your fancy, you can also use the same spring roll wrappers in cooked rolls--they crisp up beautifully to make those lovely crackly thin rolls restaurants serve.

You can stuff with items like bean sprouts, chicken or shrimp, and thinly sliced cabbage, or really, whatever you'd like. Then they can be deep fried, pan fried, or baked: pop into a 425 F degree oven for about 20 minutes, turning the rolls about halfway through.

I think that yummy sauce applies no matter what you're doing.

Tuesday, February 12, 2008

Goi Cuon!

"Bless you!" is one appropriate response when someone says, "Goi cuon!" Another appropriate response is, "Yum!"

Goi coun (pronounced "goy coon," I believe) is a Vietnamese summer roll, and while The Boy and I have enjoyed ordering them at restaurants for a while, we'd never imagined they could be so easy to make at home.

It's hardly surprising, really, since they're not cooked in any way. Recently I stumbled over a recipe for the transcendently delicious sauce that goes with the rolls, and we thought we'd give the whole shebang a try. Here's how you too, can enjoy these lovely little hand-salads.

You will need (and we found everything odd at our local Kroger, by the way):


1. Wraps, and a variety of stuffings--any or all of the following:
  • Rice spring roll wrappers - we found ours in the flat round package linked
  • rice noodles (rice vermicelli--they mostly come dried in like long very thin white tangles in bags)
  • cucumber - long skinny pieces
  • carrot - long minced skinny pieces again
  • shrimp
  • avocado (which I happened to have--that's the mushy green mass in there)
  • fresh cilantro
  • fresh mint
  • lettuce (chopped thin)
  • other meats like fish or chicken--I imagine any red meat would be just too heavy here, though you can try, if you want.
2. Articles for the luscious sauce
  • Hoisin sauce, which you should be able to get in your local grocery in the Asian section. We found ours in Kroger.
  • Chunky peanut butter
  • garlic, crushed
  • lime juice
  • sriracha hot sauce if you so desire
  • a bit of soy, to balance the sweetness of the hoisin and the heat of the hot sauce
  • a bit of water, if it seems too thick
  • a few drops of fish sauce, if you so desire
Really, the only cooking involved here is melding the ingredients for the sauce together. Put a large lump of peanut butter into a pot, and begin warming it while adding the rest of the ingredients, and allowing it to warm together and become smooth, aside from the peanut lumps. You can then pop the sauce into a bowl to cool to a reasonable temperature while you assemble your goi cuon.

This would be a perfectly lovely thing to do at a dinner party--set out the ingredients, and let everyone roll their own and eat as they go. In fact, these are best eaten fresh--the wrappers tend to get sticky if left for a while. Not that that detracts from the taste at all, but it can make handling them a little awkward.

The spring roll wrappers are like crackly paper, so set out a large flat bowl of hot/warm water along with your plate of stuffings and bowl of sauce. Place a wrapper into the water for a moment (or at least get the whole thing wet if the bowl's not big enough), and give it a few seconds until you feel the texture begin to change. Don't wait until it's floppy--it should still be a bit firm when you set it on your plate and add fillings to it. The wrappers will get floppier as the minutes go by, even out of the water, so you want to have something semi-firm to work with.

I wrapped ours like little burritos - place the fillings in a lump at the edge of closest side to you, roll them toward the middle once, then fold the two edges in, and continue rolling for a neat little package.

I admit, they look a little odd - the wrappers are flexible and practically see-though. And the texture is a bit out of the ordinary as well. They can be a bit floppy and sticky. But combined with the sauce, they're just fresh and delicious as anything.

My kitchen goes East.. or at least, it tries.

So I made those samosas, and then I found an interesting recipe for Indian chappati bread on a website called Show Me the Curry. The site was made by two Indian women who are busy moms, but wanted to show people how to cook authentic Indian food in simple ways. I particularly like the fact that they add videos for most of the recipes. The videos aren't super-professional, which I like. You can tell you're in someone's real kitchen, and that Anuja and Hetal are friends in real life. More power to them for making a website that's such a resource!

The two recipes I've tried and that have been great are the chappatis (plain flatbreads good with yogurt, or for dipping) and the aloo paratha (uses the chappati dough), which is a potato stuffed flatbread. Be sure not to miss the video down at the bottom of the page.

I'm glad there were videos for them both, as the parathas were a bit difficult for a first-timer to get right. The recipe involves patting out flat circles of dough, placing stuffing in the middle, sealing it like a dumpling, but then flouring it, and actually rolling it flat again with the filling inside. Don't let this daunt you, though! I recommend trying them--we ate our parathas with a lentil dish from Tasty Bite, and they were great. I think with a little practice, this would be a pretty quick meal. I fiddled with the seasonings a bit, and since I don't care for cilantro, I used celery leaves instead, and that worked really nicely.

The only thing I would add for those of us who haven't rolled stuffed dough before is to make sure the stuffing is pretty dry--just moist enough to squeeze into balls. Mine was a bit moister when I first started, and my first paratha exploded when I tried to roll it flat. :( I still got a few leaks on a couple other ones, but all in all, they turned out really delicious and hearty.

They were much less delicate than samosas (though those are delicious in their own right), and I bet the completed parathas freeze well, an would be perfect for lunches and such.

Thursday, January 31, 2008

Samosa Time

Tonight's kitchen adventure: Samosas, which are Indian pastries stuffed with curried potato and vegetables.

I admit I nicked the photo to the left from the nethers of the interwebs. By the time I thought about taking pictures of ours, they were pretty much gone. Next time I'll take pictures of the actual thing.

Over the past while, we've stocked up on some of the basics needed in Eastern cooking: Garam Masala, Hot Madras curry powder, regular yellow curry powder, fresh ginger, cardemom leaves--stuff like that. These are things that we don't use all that often, and will probably last us forever and a day. They're good to have around in case of a sudden hankering for Thai or Indian food.
I apologize for not having exact measurements on some of these things. I improvised a bit, and didn't measure some items in the filling.


For the shells:
  • Mix 1 & 1/2 cups flour with 1 tsp salt
  • Add 4 Tbs shortening, and cut together till crumbly.
  • Add 5 or 6 Tbs cold water, just enough to make a kneadable mass.
Get your hands into it, and knead it together for a few minutes until it becomes smooth. Set it aside in a covered bowl to "rest." God knows what tuckers pastry dough out so much, but it needs a lot of rest, apparently.

After tucking the pastry in for a nap, (quietly) start in on the filling.

You can do one of two things here. You can go whole hog, and boil a bunch of potatos and make real live lumpy mashed potatos, or you can do as I did, and mix up a pack of dehydrated mashed potatoes, mince another potato finely, and cook that up with the rest of the filling.

In a frying pan, put a little of your favorite oil down and add the following:
  • minced onion
  • minced potato (if you cheated like I did)
  • some grated or very finely chopped fresh ginger, or a few shakes of powdered stuff, I guess
Once the onions start to brown just a bit...

Add the mashed potatoes
some green peas
few shakes of Hot Madras Curry Powder
some Garam Masala
a bunch of plain yellow curry powder
salt

At this point, you can add some optional stuff, like chopped cashews, corn, or meat of some kind, if you'd like. I found these to be pretty substantial with just the vegetables, but do what you think would be yummy.

Mix it all together while heating it up. You should be able to taste test and see what you like here in terms of spices. I wasn't sure about the plain curry powder, but it turned out it needed more than I thought it would.

Take the filling off the heat, and set it aside.

Now, wake up the pastry, take a chunk of it, and begin rolling it out. You'll want a bowl or a large circular object (about 5-6 inches across) to cut out circles of pastry. Roll it out thinly, cut large circles and set them aside, making sure you flour so they don't stick together. Once you've used up all the dough, take a sharp knife and cut the circles in half, one at a time as you use them.

Take each half circle, dab some water around the lower edges, plop a decent blob of filling down in the middle, then fold the edges together and press well, so you have a little triangle with a rounded bottom. Wash, rinse, repeat until all the samosas are stuffed.

At this point, you can do one of two things. You can either deep fry the samosas, or you can bake them. Since deep frying is the traditional method, I tried it, but frankly, it was kind of terrifying in our little kitchen, and I don't think I'll do it that way again, even though they were delicious. I did find a recipe with baking directions, so that's what I'm posting.

Preheat oven to 400 degrees F, place the samosas on parchment paper on a pan, and pop them in the oven.

Once they're in, turn the oven down to 300, and let them bake for 45 minutes, or until they're golden brown.

You can dip them in chutney, or eat them plain, like we did.

YUM.

Tuesday, January 29, 2008

Makings

I have been making.

We got couple lovely couch cushions several months ago. Their covers were made of a soft woven brown fiber with a bit of a sheen to it--nice and nubbly. Unfortunately, they were sewn really shoddily, and since they were woven, they were just falling apart after only a few months. It was a shame to let the fabric go to waste, and since I lost my last pair of wrist warmers (Wrist dickies, as we refer to them. Remember turtleneck dickies from the eighties? It was just a neck and a bit of cloth, so you looked like you were wearing a turtleneck without bothering to actually put one on under your sweater. ) err... sorry about the detour. Since I lost my last pair, I thought I'd repurpose the fabric to make new ones.

I reused the zippers, and made use of the silk edging already on the inside of the cushion cover. I added some reinforcing ribbon, and a loop and button to close it at the top. I also had to add a long loop of thin ribbon on the inside at the elbow end, so I can hold that with my teeth as I zip them up. Otherwise I'd have to have the Boy zip them up, and that would just be lame. This one needs a little more stitching added to the ribbon, but it's basically done. Both of them took me about an evening.


Not a difficult project, and my sewing machine was lovely and behaved perfectly. I seem to have the tension issue well in hand.... Quite accidentally, of course, but I'm not touching it, since it seems to be a-ok. This is a machine the Boy got me a couple Christmases ago. I remember using my mother's machine, which required hours of squinting and threading needles and trying to readjust bobbins... All of which, doubtless, was my fault. But this new machine is fancy. The little design on the black ribbon is made by the machine sewing little patterns. Fancy. It is too fancy to be Amish. (link to a sweet children's book--check out the illustrations about halfway down the page.)

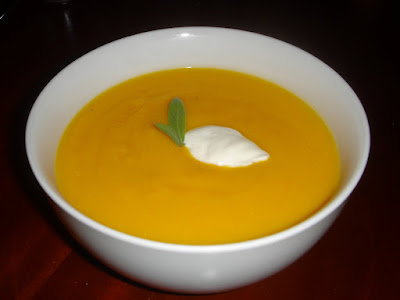
In other, more edible news, we made a butternut squash soup that turned out quite yummy.


I'd never made one, but we'd liked a few we'd tried various places, and it seemed easy enough. I wasn't quite into any of the recipes I found, so combined the parts I liked into a slow cooker recipe that turned out really nice. It's very simple, and very comfort-foody.

  • 1 raw butternut squash
  • a pat of butter
  • nutmeg (I grated about a third of a "nut" of nutmeg--I think that would be about a half teaspoon of the ground stuff? I kind of wished I'd used more though.)
  • hot madras curry powder - a decent amount. it's not that spicy, and the finished product is not at all spicy.
  • cumin - a nice shake, but not too much, because it can overpower the taste of the squash
  • chicken stock - I used enough to just come to the level of the cubed squash in the slowcooker.
  • sour cream - a heaping tablespoon
  • one dollop of cream or milk
Cut the squash in half, and then slice it so that you can cut off the rind. Once that's done, cube it, and throw it in the slow cooker with the stock, butter, nutmeg, curry powder, and cumin. Let it cook away on medium high for 2 hours, or you could put it on low for 8 hours while you're at work.

At this point, the squash may not be totally mushy, but will be soft enough to blend. Scoop the chunks out into a different bowl, then blend them several at a time, pouring them back into the slowcooker as you go. Add stock while you blend to keep things moist. Some people might like theirs silky smooth, but I found it was really pleasant with a little texture to it, so I didn't blend forever.

Once everything's blended, turn the heat to medium or a bit lower, and wisk in the sour cream and a blop of cream or milk. If you boil at this point, it'll curdle, so keep the heat down a bit.

You can serve right away, or let it simmer another while. We served it with a couple sage leaves, and a bit of sour cream. I have a feeling this soup is one of those ones that will be even better the second time around. The recipe makes quite a bit, so you can pack it up into the freezer or fridge to use another day like we did.

Tuesday, October 23, 2007

Rawk n' Bawk

So we just had an exceedingly delectable dinner of chicken, and I thought I'd share the recipe in case anyone wants to give it a shot. It was actually pretty low-key in the time you actually spend making it, which is always a massive plus in the kitchen. I kind of compiled several recipes and this is what happened. Please excuse my not having precise measurements. The kitchen might as well be a lab with all the experimenting that happens in there.

So, without further adieu... Preheat your oven to 500 F. Yes, I know. HOT. But you turn it down later. It just gets things crispified.

Stuff you'll need:
  • Chicken, duh. We used a whole one, though I could see this working well with chicken breastses.
  • Roasted cashews. Lots of them. The ones I used were salted, which was fine.
  • fresh basil - a good handful of it. If you don't have basil, parsley might work, as well as (shudder) cilantro, which I hate. Don't worry about stems and such.
  • two cloves of garlic, or two decent dollops of pre-minced garlic
  • soy sauce
  • lime juice. I actually used lemon because I didn't have any lime, but I think it would be even better with lime.
  • Olive oil. You could also use one of the lighter oils like grapeseed oil or walnut oil.
  • fresh jalopeños, diced - I only used one, and was a little sad I didn't use two. I like things fairly spicy, but I would recommend one for people who aren't sure how spicy they'd like it. Careful when you're cutting these suckers up. That oil is pretty hard to get off your hands, and it stings like a mother when you rub your eyes.
So. Get out an instrument that will make something into a mash. I had to use our lame blender, but if you have a food processor, that would be ideal. Into the blender or whatever, dump:

a cup and a half of cashews - Make sure there are some left for later
the garlic
some soy - I probably used a couple tablespoons?
all the basil or whatever herb
a blop of olive oil
lime juice - couple tablespoons here too, maybe?
sea salt
fresh ground pepper
the jalope
ños

The idea is to blend all this stuff into a paste. You can use the soy and lime juice to control the wetness of it, etc. I kind of went by smell as well. you don't want one thing to be overpowering.

If you're using a whole chicken, put it into a baking pan that has some room around it, and stuff it with whole cashews and a bunch of the paste you just made. You can also rub a bunch of the paste all over the outside of it.

Stick the chicken in the oven and turn it down at once to 350 F. Then, walk away and do other things for about an hour and a half, depending on how big your chicken is. Time varies according to weight, so you'd have to figure out the appropriate amount.

All that's left is pulling it out when it's done, and digging in!

It turned out to be nutty and savory with a tad of spiciness as well. Just lovely. We're thinking we'll probably try this on our thanksgiving turkey, since we can't have bread stuffing. I bet that some baby portabellas would be good chopped into the stuffing, too.

Let me know if you try it, and what you think!